Updating GOTEK Firmware to use HxC and On-Screen-Display (OSD) on your Amiga:
I really wanted to like and use the HxC firmware, but I have returned to FlashFloppy+ v3.38 as I could not get the OSD feature to work for me, and I destroyed 2.5 Gotek drives trying. It was also a challenge to return to FlashFloppy so make sure the upgrade is right for you, before upgrading.
I had some trouble with the instructions, but Jeff was very tolerant and generous with his time to help me through HxC related issues. It is a luxury to be able to contact the designer directly for help, just like the Parceiro! You can see the FlashFloppy support for my return from HxC here. Really fantastic support from Kierf, thank you!!!!
Note: there are some quirks using HxC on a modern GOTEK drive, some of these quirks apply to both FlashFloppy and HxC.
- The second drive (df1:) emulation only works with a HxC hardware device, it will not work on a GOTEK drive. I was hopeful, as emulating 2 drives from one device would be a really neat feature and save disk swapping! <sigh>. Maybe in the future?
- The Mac OSX version of the "HxC Floppy Emulator v2.5.6.6" writes config files that don't really work on your Amiga. For example, after using this software, I only have 54 slots to put disks in, but using the config file in the zip download from HxC, I have 999 slots.
- I am recommending you do not format your USB drive on Mac OSX, there is a bug in how Mac OSX which hides the "." and ".." directory entries and this might cause problems navigating folders on your Gotek (Current firmware for both HxC and FlashFloppy caters for this and won't be a problem). The issue in the past meant that once you entered a sub folder, you can't get out until you restart your machine, aghhh! Use a PC or Linux and GParted to create your partitions and format the disk (See Linux solution below).
- Be very very careful performing the OSD mod for the HxC firmware - I destroyed one drive by having my iron too hot and lifting the solder pad and track. I destroyed a second drive when I swapped Video-out and CSync during testing, and this appears to have fried my Artery chip. I lost the ability to upgrade from USB Stick on a third drive during testing, but can not tell what is wrong. I can still use this drive, and I can still upgrade using the program method.
First, why upgrade?
- The easiest to mod OSD is with the HxC firmware (see warning above) on your Gotek and is now available to work with AT435 GOTEK drives (pretty-much all modern GOTEK drives). OSD was already working with older STM32 drives, these are pre-COVID drives - check your chip carefully before modding! This is a really great solution, and easier (albeit less portable) than the FlashFloppy solution because it only uses 2 wires. However the FlashFloppy Blue Pill, is straightforwardly interfaced with any recent version of FlashFloppy on any Gotek, so both are good options!
- Inn my opinion, HxC has a greater range of drive noises than FlashFloppy - it's the little things :)
- Customise your own firmware, see the website for more info
- Jan23: Jeff has fixed a MacOSX issue with the missing ".." : Apparently for some reasons macOs set the hidden flag for the ".." entry...
- Jan23: Jeff's filesystem now supports up to 12 subfolders on the firmware.
- Jan23: An issue with files appearing unsorted appeared only on the AT32F435 gotek, Jeff has fixed this...
- Jan23: Jeff has also fixed hidden / os files are now hidden on both firmware and file selector.
- The AUTOBOOT.HFE (also available on FlashFloppy), allows you to assign disks to 'slots', which is handy to reduce cognitive dissonance when scrolling through hundreds or thousands of ADF's by creating a virtual 'container' that has just the disks you are looking for right now. Meanwhile, your entire library of disks is still available on your USB Key to swap into slots anytime you want.
- Possibly higher compatibility with .IPF images (original disks including disk based copy protection). I have not found anything that won't work with FlashFloppy so far (Noting for FlashFloppy and Gotek 4.35 drives, you need a jumper on MOR and set a 500ms motor delay in your FF.CFG file - motor-delay = 500 to use the IPF version of Killing Game Show)
- Support the Amiga community and further development of the HxC firmware
Otherwise, FlashFloppy does the same job for free, both are very easy to navigate, and either option is an essential upgrade to any Amiga!
The theory of modding your PAL Amiga 1000 for the OSD add-on
The FlashFloppy Bluepill solution is already well documented on the
FlashFloppy site, I have not tried this yet, maybe in the future.
Now that the OSD feature is available for AT drives, or you have an STM32 drive, then following are the mods for a PAL (single mainboard) Amiga 1000 (The NTSC may be different):
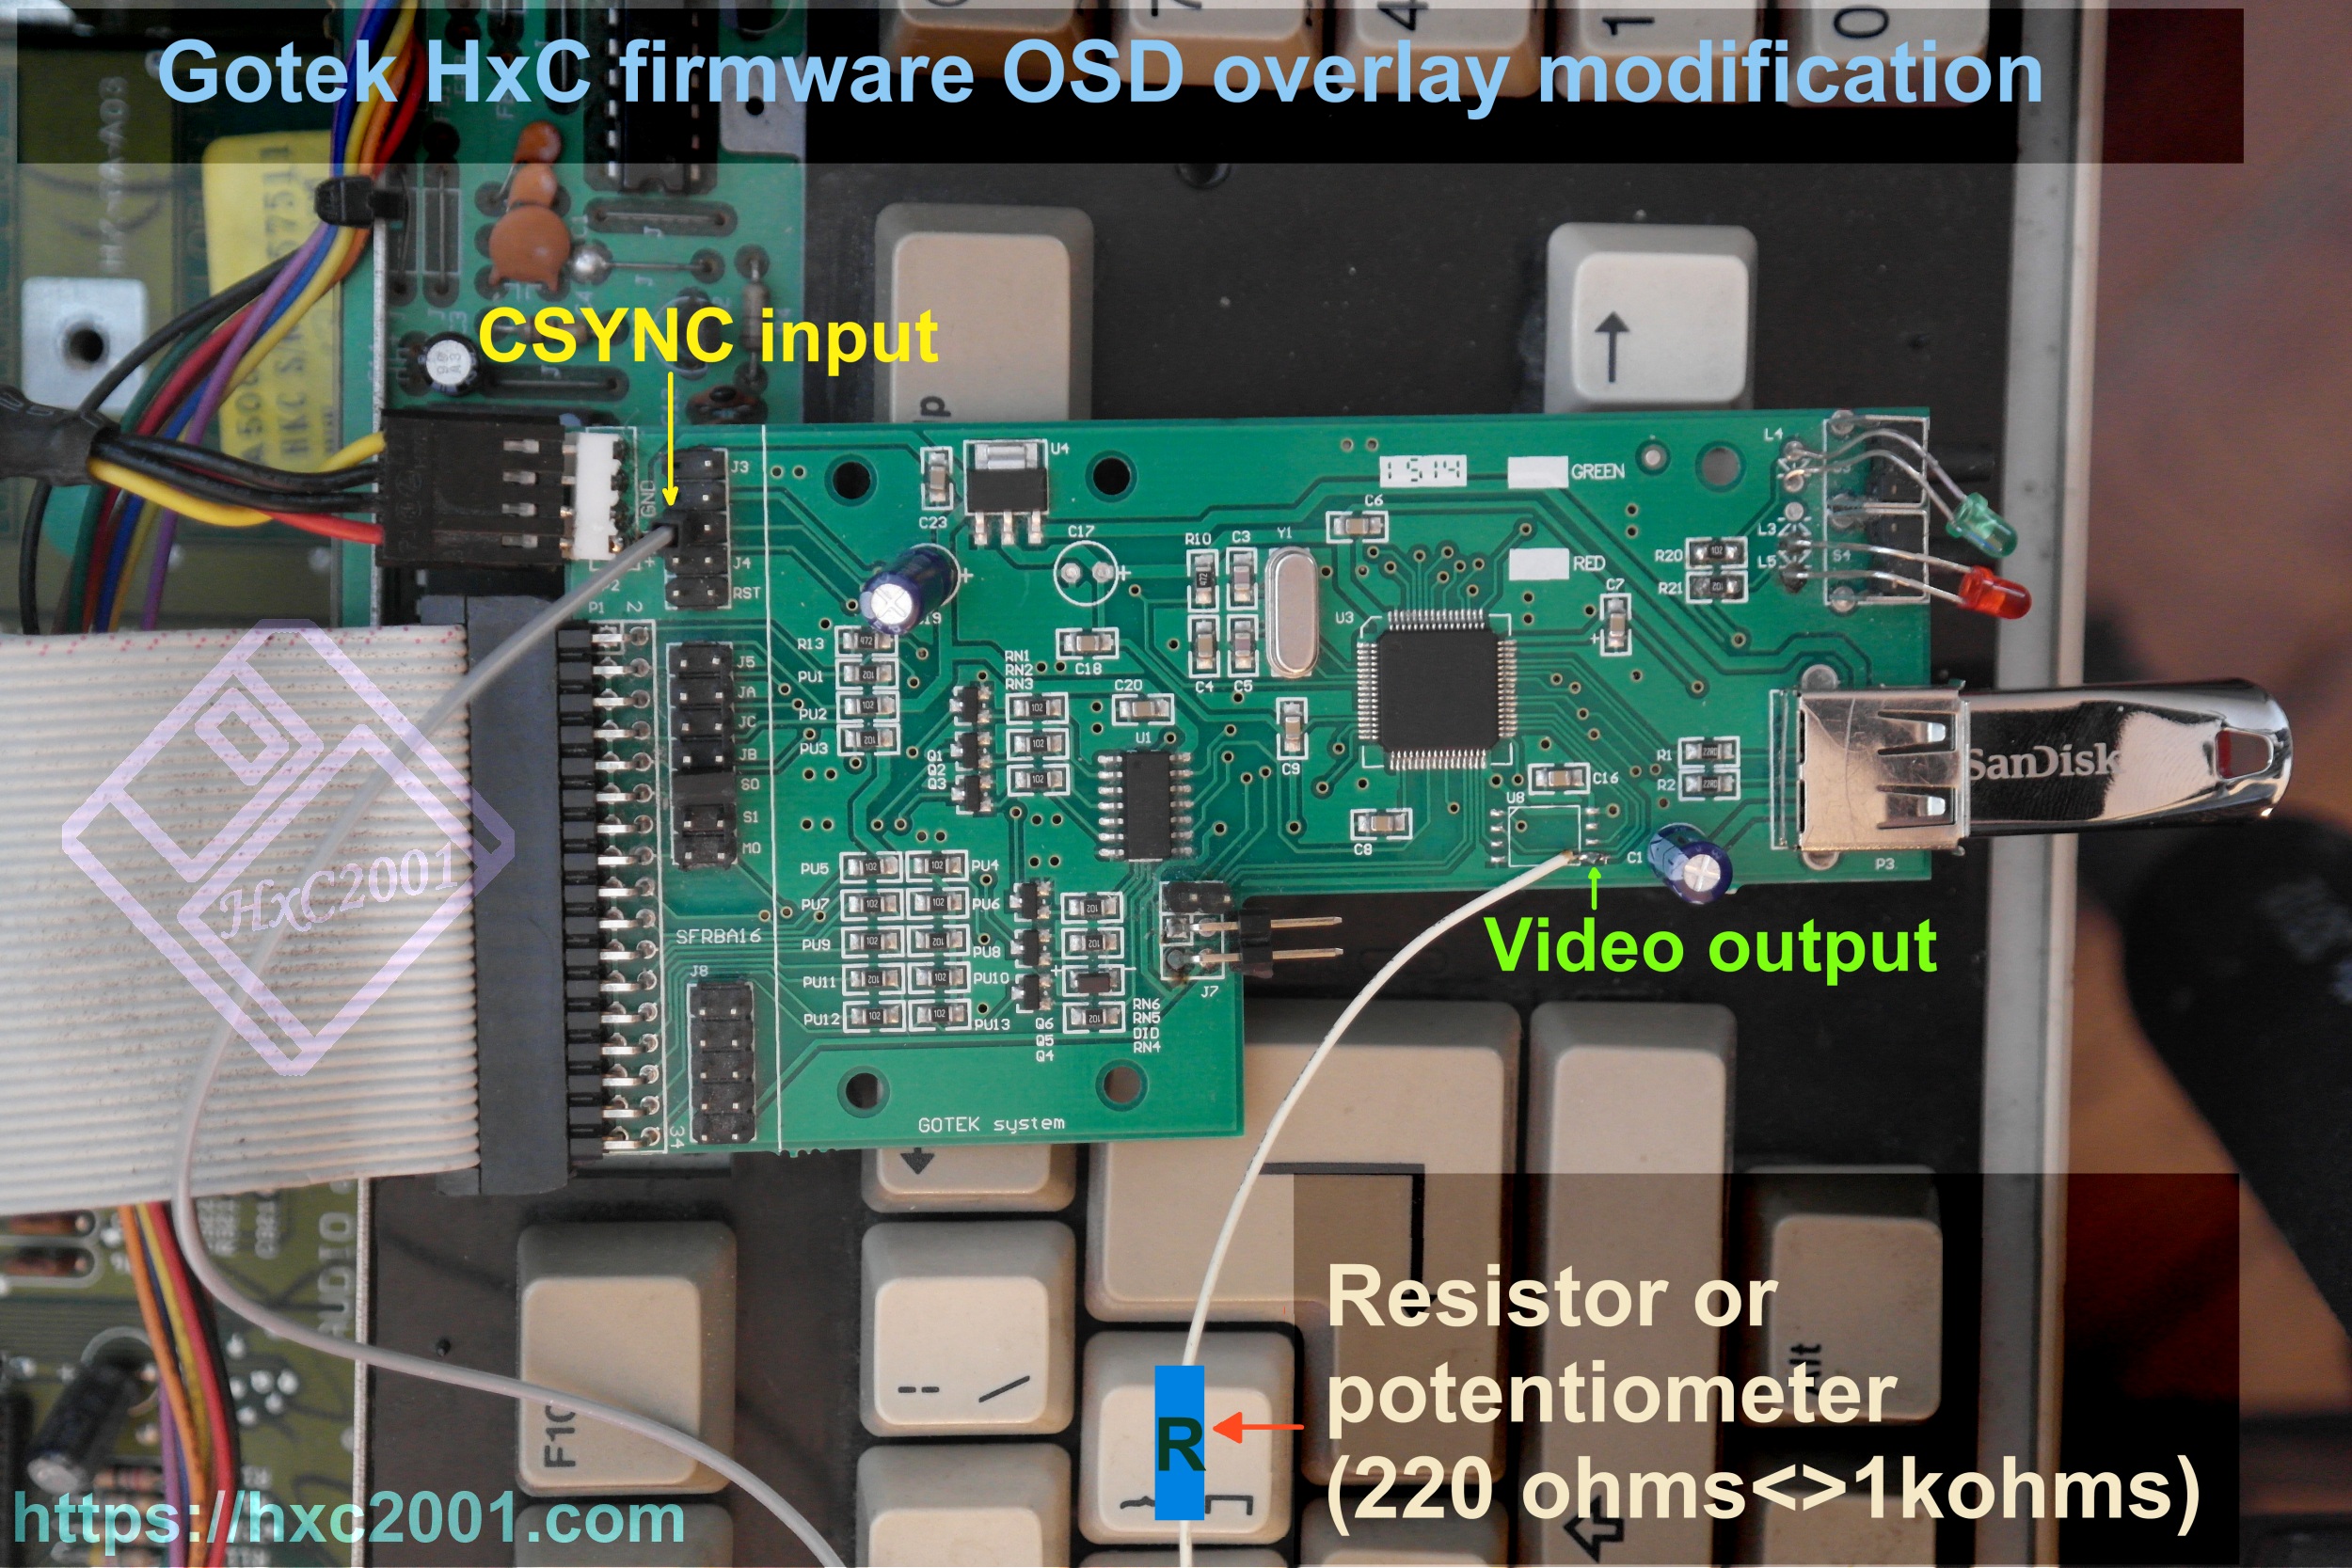
You need to pickup CSYNC from U6A:
And you need to pickup either Red, Green, or Blue - I picked green because it is the colour recommended on the HxC website. The easiest place to pick this from, I thought would be resistor R24 (This never worked for me - BEWARE), but note you also need a 220 Ohm or 470 Ohm resistor wired in series, or use a 220 Ohm - 1K Ohm Potentiometer. This wire and resistor controls the brightness of the OSD. I chose a 470 Ohm resistor, but I cannot tell you if that was a good choice as I never got this working on my Amiga 1000.
And then you need to wire up the GOTEK drive. The CSYNC wire is pretty easy - go to your local electronics store and get some header pins, solder them in per the pic on the HxC website, and borrowed below for convenience, easy.
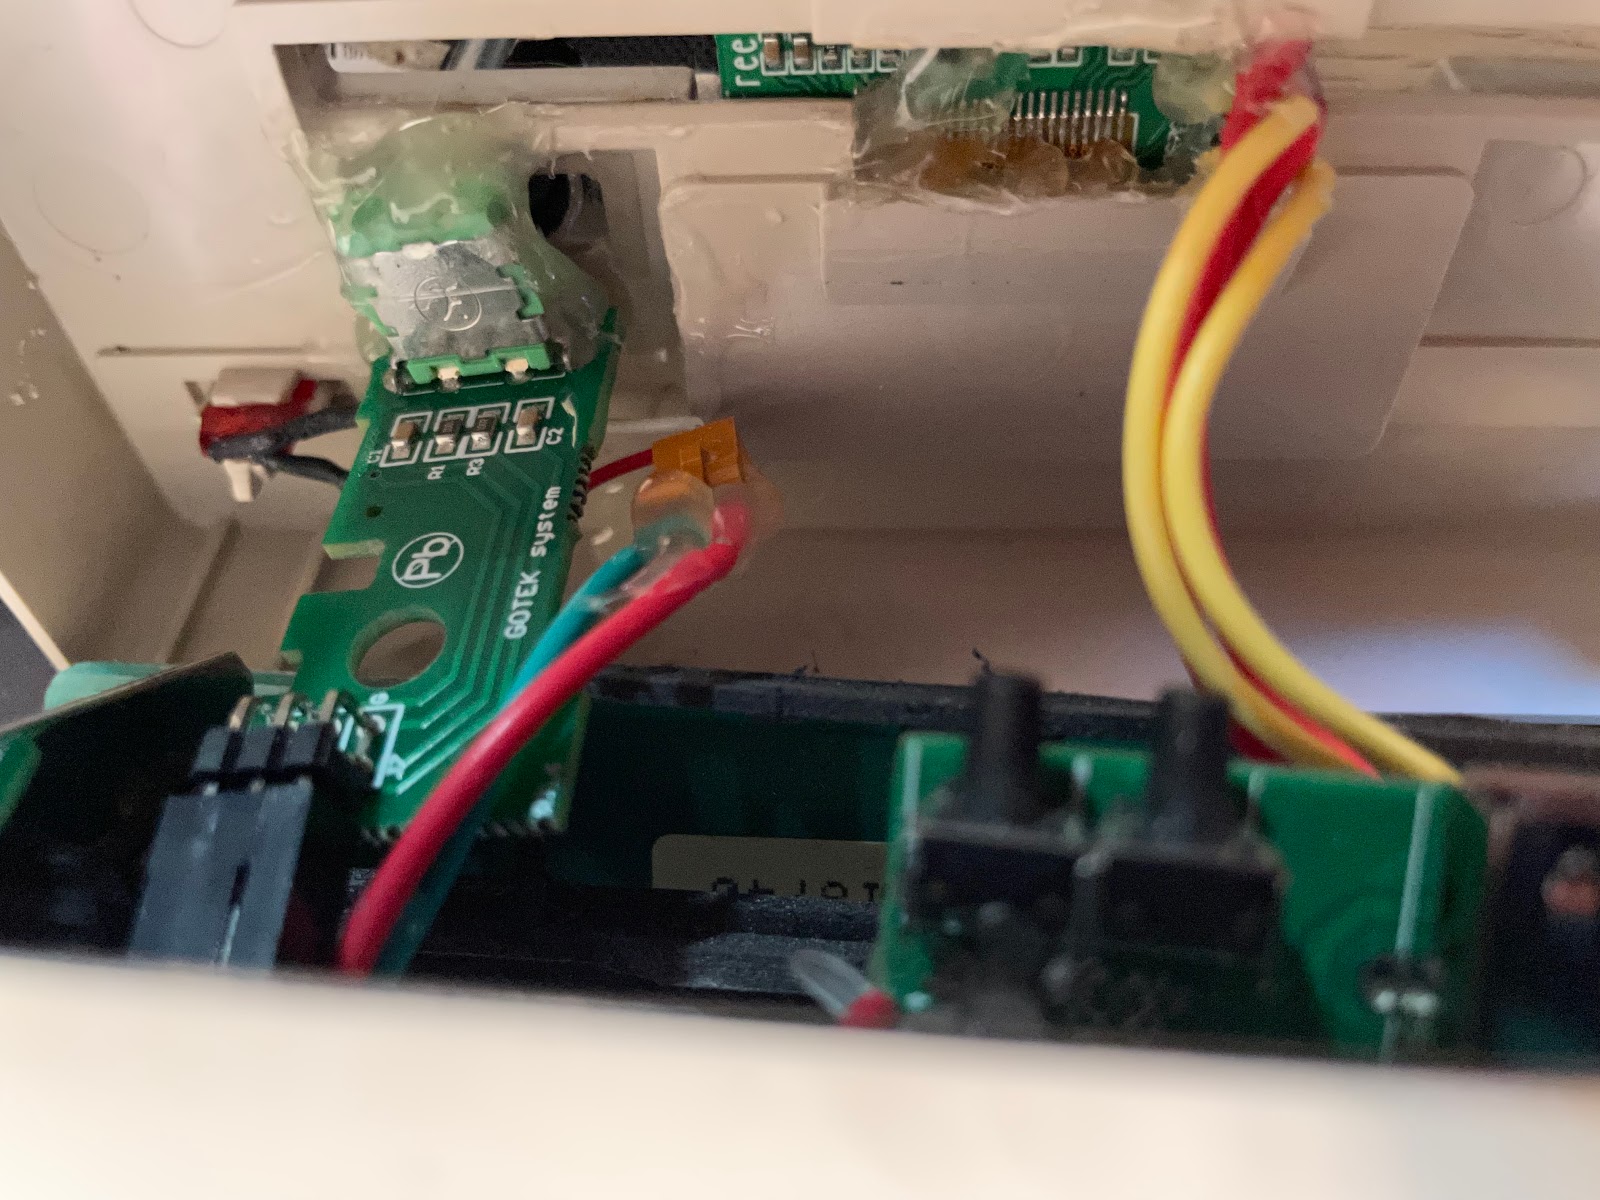
The Video output line on the Gotek board, I found really difficult - partly because it is such a delicate and small solder pad to get a good connection with your wire, mostly because my soldering iron was too hot at 360 degrees celsius, and as a result lifted the solder pad off the board.
Tracks and solder pads on these GOTEK drives are really thin and delicate. But also, the solder point is tiny and the wire is a monster next to it, really hard to get a good fix with solder alone. A video microscope is very helpful here, I use this one.
I used hot glue gun to fix the wire in place, once I had continuity again! It is very easy to break off due to the very small solder point, it needs help to stay safe. It's the white wire on the left in picture above. The Blue wire in the picture is the CSYNC - colours do not matter, it's just what I had lying around.
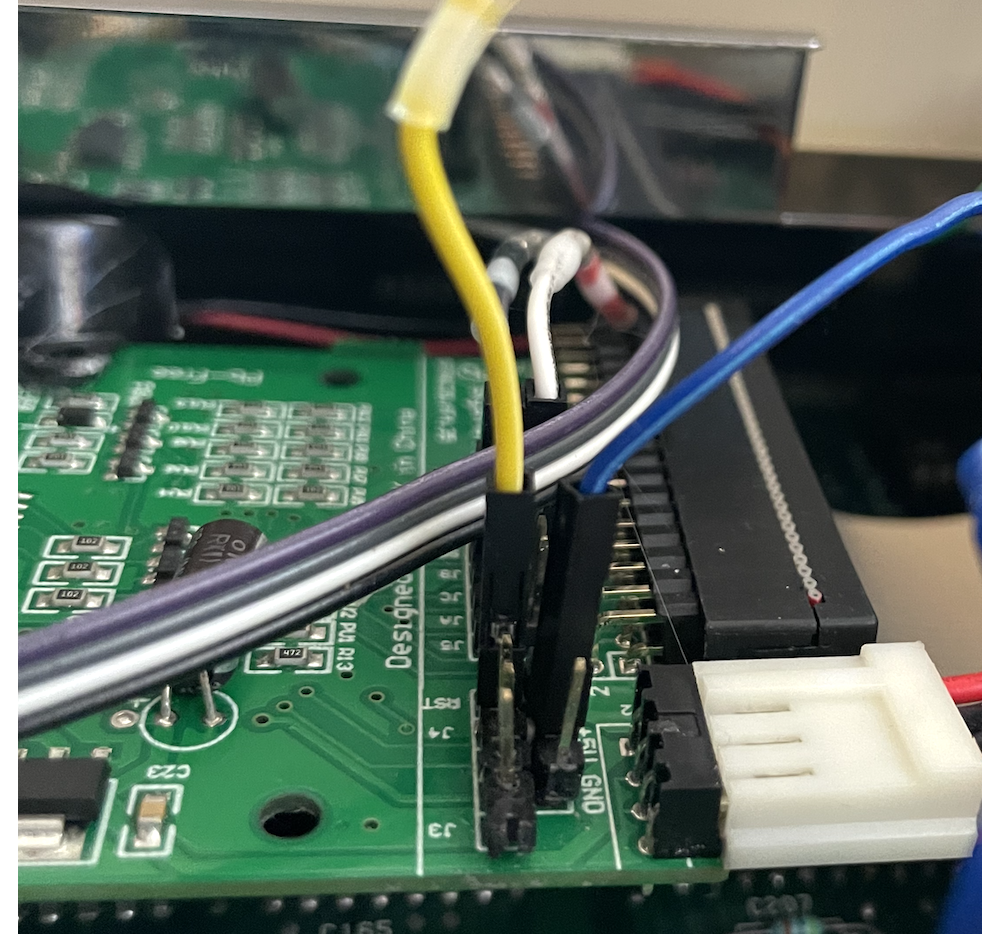
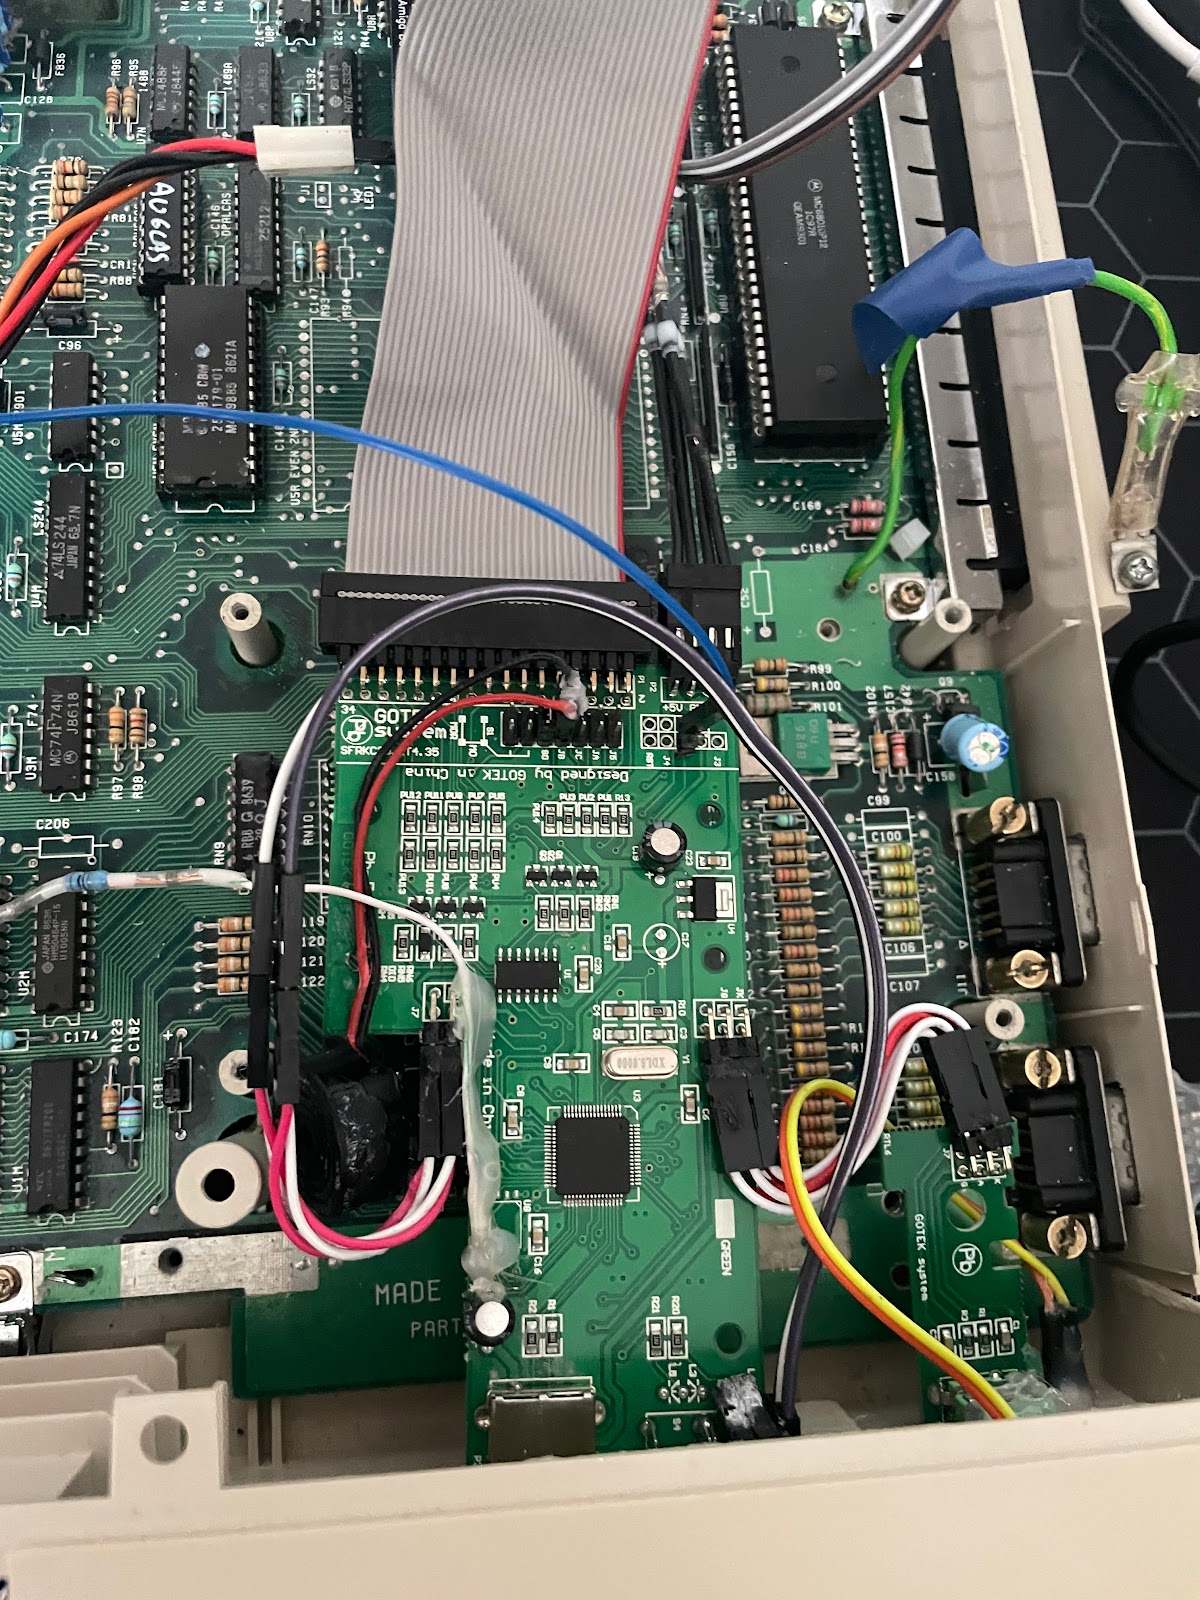
Jeff also had an alternative which I think was much easier to mod on the Gotek board. It is hard to get a good shot, so I've included a few pics. On the top row, it's the third pin from the left for CSync, this is the blue wire in my pics. On the bottom row, it's the second pin from the left that provides Video-Out. DO NOT GET THESE WRONG - I blew one of drives by swapping these! You have been warned:
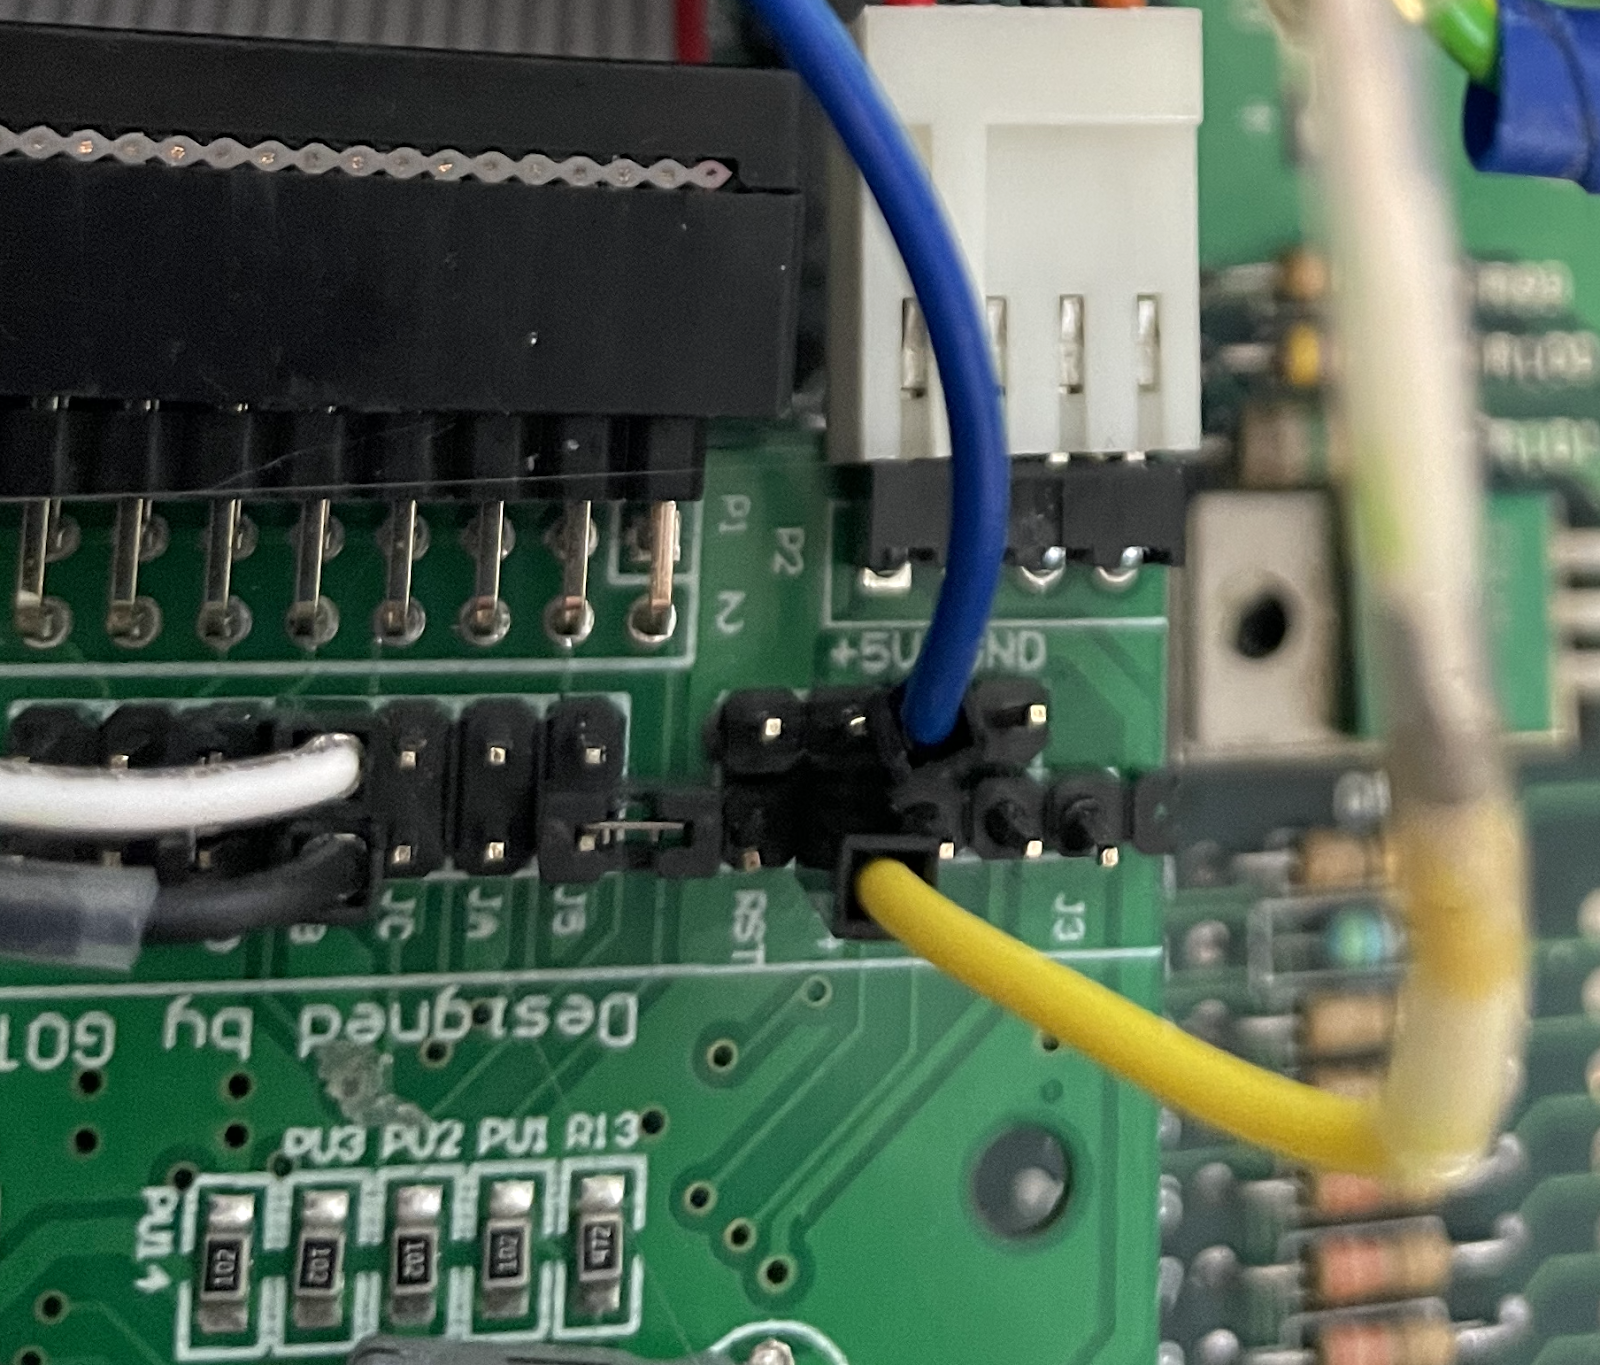 |
Blue wire is CSYNC, the 3rd pin from the left on the top Row
Yellow wire is Video-out, 2nd pin from the left on the bottom row
 | | Another view from above - don't mix up the wires |
|
 |
| Side view |
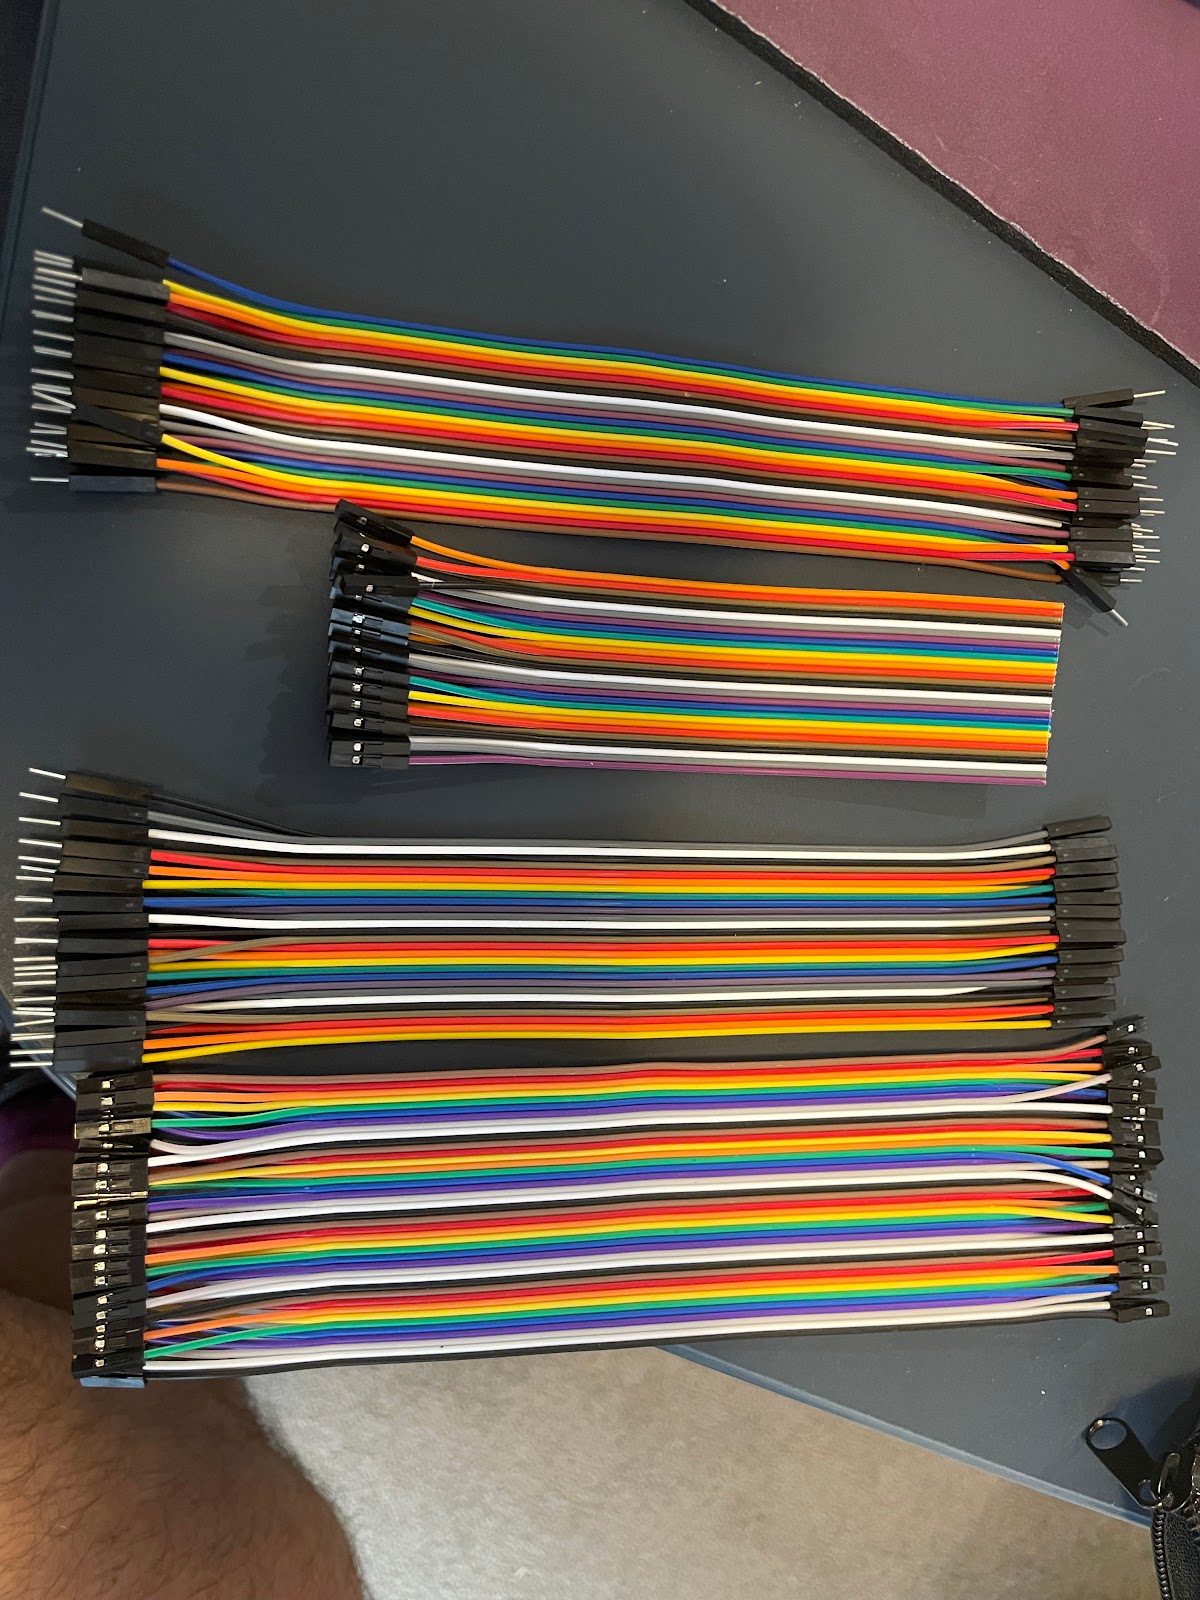
I soldered some header pins into these otherwise empty pin holes to make life easier for this mod and for future mods or programming. Using these Dupont wire packs makes connecting to header pins a breeze. Dupoont wire packs were readily available at my local
Jaycar Electronics, but I could not find them on their website. They come in M-M, F-F, F-M packs and a combination of them is handy for all your mod projects.
Really easy to strip a single wire or as many wires as you need off and / or to cut an end off and still have an end that easily connects to a header, for a safer and more professional finish.
Ask Jeff about the HE10 mod and firmware if you would prefer a less risky mod option. Going back to the first attempt at modding my Gotek for OSD:
You can also see I have added a piezo buzzer to my GOTEK, this is the red and black wire in the photo below. I found I missed the floppy drive sound, and even though it's not accurate, it makes me feel closer to what my Amiga 1000 "should be".
Finally, I replaced my DF0: with the GOTEK drive, it's a really great quality-of-life upgrade to consider. Full disclosure - my previous mod of the
74LS157 at U1T, meant I did not have a choice. The socketed IC meant my Floppy Drive would no longer work!! agghhhh!!
So, the yellow and orange wires in the bottom right go to my floppy LED. I use wire snips to snip the GOTEK LED, and then wired these to the floppy LED. Again, it makes it feel more original, it's amazing how alienating no floppy drive noises and no flashing LED get under your skin :)
With the hardware mod done, moving on to the software.
Upgrading your GOTEK to the HxC firmware
I have a GOTEK AT4.35 as mentioned above, one nice feature is the ability to update firmware from USB, hence no need for USB cables, serial programmers etc. This also works for loading the HxC firmware, yay! The instructions on the HxC website I found were difficult to follow, hopefully the following helps others with a similar experience.
Go to the
HxC website and purchase the HxC firmware (12euro at time of writing - you can find it under the 'Software Store')
This will get you a link to the BootLoader, You need the HxC Bootloader before you can install the new firmware. WARNING: If you decide you need to go back to FlashFloppy after doing this, you will need to re-program your GOTEK! It's not too hard (instructions below).
Ignore the Downloads page on the HxC website, I found this gave me incomplete archives, and just confused things unnecessarily.
Format a USB key as FAT16 or FAT32 and ensure you use an MBR, not GUID partition scheme. If you use
SD Card Formatter, it will do this for you.
--------------------------------------------------------------------------------------------------------------------------------
HOWEVER - Note for Mac OSX Users!
Mac OSX will format a disk with an MBR partition and FAT32, however it hides the directory navigation entries "." and "..". HxC as of firmware v5.1.2.1a will handle this bizarre behaviour, but other systems may not.
 |
| Notice the "." and ".." line items are missing when formatted as FAT32 on Mac OSX on an old version of the firmware and AUTOBOOT.HFE. This is no longer an issue. |
From memory, the '.' means the current directory, and the '..' means this is a subfolder from the root, but that's going way way back...
I used a Raspberry Pi and GParted to partition and format my USB drive, and the directory
.
..
Directory indicators were available again. Phew! I can navigate through the USB drive again!
--------------------------------------------------------------------------------------------------------------------------------
See the extra tip on annoying hidden files produced by Mac OSX below.
Now, if you are not using a GOTEK drive revision AT4.35, you will need to use the instructions on the website and email and eventually you will get there.
Or check out this
YouTube video.And those with an AT4.35 can shortcut that grind. With a GOTEK AT4.25 drive, we can upgrade firmware from a USB drive, so no need for re-programming or USB cables, and it's far easier than the instructions on the HxC website!
Send an email to the HxC activations email(on the HxC Site)and you will get an automated reply with a zip file attached.
The Boot loader is found in the "Offline_HxC_Gotek_install.zip" which should be emailed to you - or send an email to the same Hxc Activastions email and it will automatically reply with the zip file.
 |
| The zip file contains the Bootstrap/bootloader files |
In the email you recieved after your purchase, you will also get a link to the firmware, this link might change, but this is the link I received:
Ignore the link to the SerialBridge, you won't need it if your GOTEK drive can upgrade from a USB drive.
Copy the EXCHANGE.BIN file from the Offline_HxC_Gotek_install.zip to the root of your freshly formatted USB drive. EXCHANGE.BIN is found under the bootstrap_firmwares folder once you have extracted the zip.
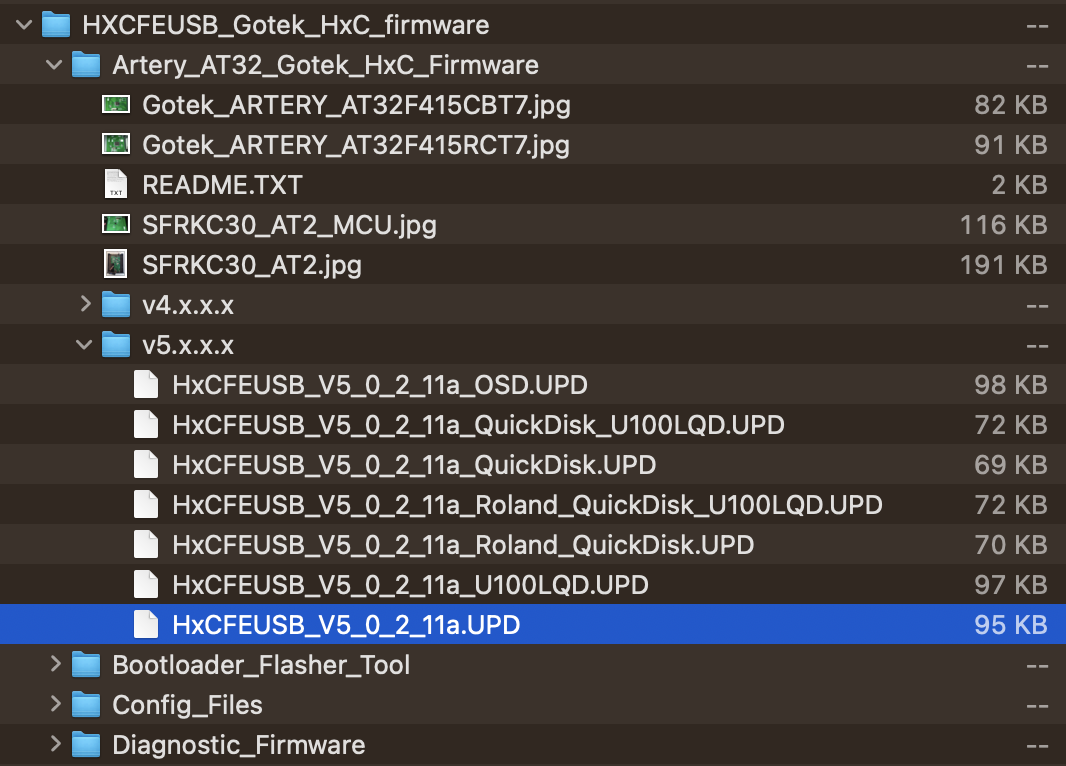
Copy the latest firmware from the HXCFEUSB_HFE_firmware.zip to the root of the USB drive. The latest firmware is found under the 'Artery_AT32_Gotek_HxC_Firmware' folder, at the time of writing, the latest for me was in a sub-folder called v5.x.x.x named 'HxCFEUSB_V5_0_2_11a.UPD'
and is highlighted int he picture below.
Ignore all the other folders and firmwares, they are just a distraction, and in my case I found all the other firmwares did not work on the AT4.35.
Eject your USB Key and insert it into your GOTEK drive with your Amiga turned off.
Press and hold down the two buttons on the GOTEK drive (not the Rotary) and while still holding these down turn on your Amiga.
In a few seconds you will see a message on your OLED about a 'FlashFloppy upgrade'. Release the two buttons.
Your OLED display will run through a few things and then flash the new HxC firmware to your GOTEK drive. If you get an error you can usually switch off your Amiga and start again.
Errors during update are reported on the LED display:
- E01 No update file found
- E02 More than one update file found
- E03 Update file is invalid (bad signature or size)
- E04 Update file is corrupt (bad CRC)
- E05 Flash programming error
- Fxx FatFS error (probably bad USB drive or filesystem)
If everything goes well, you will see 001 on your OLED. DO NOT turn off your Amiga.
Remove the USB drive without turning off your Amiga or GOTEK, and plug it in your computer. Copy the EXCHANGE.BIN file into an email and send this to the HxC Activation email.
The HxC website advises to wait 15 minutes, but in just 2 minutes I had a reply with a new EXCHANGE.BIN file.
Copy this new EXCHANGE.BIN file onto the root of your USB drive, overwriting the previous file (we don't need the old file anymore).
Plug the USB drive back into your GOTEK drive (which you left turned on and sitting on the '001' screen)
In a few seconds the GOTEK drive will continue the upgrade, and the number on the OLED will change to 002 and a few seconds later to 003.
003 means the new firmware has been loaded and about 10 seconds later you should see some indication that the HxC firmware is done and ready. Turn off your Amiga.
Remove your USB Drive and place it back in your computer. you can remove the the EXCHANGE.BIN and any UPD files now. The EXCHANGE.BIN file will not work again, if you need to refresh later, you will need to start again from where you extracted the EXCHANGE.BIN from the "Offline_HxC_Gotek_install.zip".
You could just dump .HFE .ADF files onto the USB drive now and use them, but beware that HxC does not sort your files alphanumerically (see below in this blog post for how I fixed this with FATsort). HxC sorts files by file date in its 'normal' mode and when selecting files in the File Selector software. Note that .ADZ, .DMS, .IPF, .AMigaDOS formats require conversion to the HFE V3 format with the
HxCFloppyEmulator and then they too can be used by either HxC or FlashFloppy. This is where the slots come in to play.
HFE is the standard HxC disk format, but it reads and writes Amiga disks just fine, you do not need to convert them. If you ever do need to convert disks to HFE format, then HxC provide an application for your Mac or PC to do this on their download page called
HxCFloppyEmulatorSoftware.
From the
HXCFEUSB_HFE_firmware.zip archive again, go to the "File Selector" folder, and under Amiga, copy the AUTOBOOT.HFE and HXCSDFE.CFG files
to the root of your USB drive.AUTOBOOT.HFE is the application for your Amiga, in a .HFE format (the HxC disk format). You can load this in Workbench, but it must be run from the GOTEK 'disk' as it reads and writes the config file back to the AUTOBOOT.HFE disk.
HXCSDFE.CFG is the config file used by HxC. It is not a text file and can only be updated via the GOTEK drive with he HxC firmware installed, or some options are modified via the File Selector tool from the AUTOBOOT.HFE disk.
The HxCFloppyEmulatorSoftware will also write a config file for you, but do not use this. At least on Mac OSX there is some problem where the HXCSDFE.CFG written by the HxCFloppyEmulator software will only give you 54 slots, instead of the 999 you should have, and other weirdness.
If you have not already done so, copy some Amiga disks onto your drive, use sub-folders if you like to make them easy to find. When done, plug the USB drive back into the GOTEK and start your Amiga up again!
If your GOTEK drive is DF0: it should automatically boot to the File Selector on the AUTOBOOT,HFE disk. If it is DF1: you might need to open the disk from Workbench and double click the 'HXCFEMNG' icon.
The idea is that you assign a disk image to a slot, and then when you are using the 'Selector' mode, only the disk images you have assigned to slots will be available as you turn your rotary knob or use the two buttons on the GOTEK drive.
So instead of scrolling through hundreds or thousands of disk images - you conveniently only see the disks you are interested in. You can go back into the File Selector and change/add/remove disk images as much as you desire.
You can look online for more info of using the File Selector, just a few more hints from me:
Normal mode reads the files directly from eh USB Drive, but in file date order, not alpha-numeric, so your files may appear in a very random looking order. Disk 1 and Disk 2 could be anywhere in the list.
Selector Mode uses the assignments you have made to slots and will show files in the same order you placed them in the slots.
Indexed mode is for those who use the file naming convention of DSK000... I haven't used this and don't know what the advantage is, if any.
Press Left-Amiga+N keys to switch to the Workbench.
Press Left-Amiga+M keys to switch back to the HxC File selector (or any other Workbench friendly full screen software...).
Press and hold for about 2 seconds, the two buttons on the GOTEK drive to eject a disk or to insert a disk. A message will pop up on your OLED to say 'disk ejected' or 'disk inserted'. It is handy when you want to boot from hard drive rather than DF0:
Pressing F3 when in the 'File Selector' and going to 'Drive Options' will give you options to always boot the AUTOBOOT.HFE when the Amiga and GOTEK are first powered up, and to start with the 'disk ejected' - which otherwise uses whatever the last disk you had in the drive as the inserted disk. Look for
Load AUTOBOOT.HFE at power up
Eject disk at power up
Think of this as more like taking the GOTEK drive offline or online, because you change the disk at any time using the buttons or the rotary, but if the GOTEK is ' disk ejected' the disk will not be recognised by your Amiga until you hold the 2 buttons again for about 2 seconds to 'insert' the disk again.
The DF1: ON option should be turned OFF. The GOTEK drive can NOT emulate 2 drives, you need the
HxC hardware to use this feature. If I had known about this earlier, I would have purchased one of these instead of the GOTEK for the 2nd drive feature.
I love my GOTEK, though, and highly recommend every Amiga owner needs one, you choose which is best for you - HxC or GOTEK and FlashFloppy.
Troubleshooting once HxC firmware is installed:
Finally, what if something goes wrong once you have the HxC Firmware installed? First of all, contact Jeff via the HxC website, and be patient - timezone differences and real life might mean waiting a few hours for a reply. It's faster than the old days of snail-mail!!
If things go really wrong, you can't just flash back to FlashFloppy, you can only use HxC updates from here, however Jeff has updates to get you out of trouble, so ask!
HxC firmware update errors
from the HxC Manual- Error 1 (blink 1 times and 2 seconds pause cycle) No entry point (→no software flashed)
- Error 2 (blink 2 times and 2 seconds pause cycle) USB init error.
- Error 3 (blink 3 times and 2 seconds pause cycle) FAT error.
- Error 4 (blink 4 times and 2 seconds pause cycle) UPD File not found!
- Error 5 (blink 5 times and 2 seconds pause cycle) Bad UPD File header! (bad file)
- Error 6 (blink 6 times and 2 seconds pause cycle) Bad data crc! (file corrupted)
- Error 7 (blink 7 times and 2 seconds pause cycle) Bad data size!
- Error 8 (blink 8 times and 2 seconds pause cycle) Write error (STM32 flash error)
sudo du-util -l
If you are really stuck, you need to re-program your GOTEK drive to get back to factory settings and firmware.
Re-Programming your GOTEK back to FlashFloppy
You will need a USB-A to USB-A (Male-Male) cable or a USB-C to USB-A Cable.
Then, with he GOTEK Drive turned off - you need to jumper your GOTEK Drive per the
GOTEK Wiki.
Now turn your computer on, do not connect the USB cable yet.
A great post by Lee-Adamson on how to re-program your GOTEK from Linux (I used a Raspberry Pi Zero) if you want to go back to FlashFloppy from HxC. A situation I found myself in once, but I am using the HxC firmware now.
From Lee-Adamson's post:
Stay as far away from the official ISP Console Programmer software as possible. This is the most important step.
Become root (just start each command with sudo is an easy way to run as root. These commands will fail if you are not root/using sudo).
apt-get install dfu-util
Download the flashfloppy release and unpack it. There will be a dfu/ directory containing the firmware file.
You want to use the .dfu file, not the .hex file.
set the programming jumper on the gotek as
per wiki.attach gotek to linux box via usb-a to usb-a cable.
dfu-util --l (# This should display two entries for one device (just different alt numbers). If more than one device is shown, you'll have to add the --device option as per the dfu-util manpage).
Here is my result after running du-util -l on a Raspberry Pi Zero (note I did not use --l as per the instruction)
$ sudo dfu-util -l
dfu-util 0.9
Copyright 2005-2009 Weston Schmidt, Harald Welte and OpenMoko Inc.
Copyright 2010-2016 Tormod Volden and Stefan Schmidt
This program is Free Software and has ABSOLUTELY NO WARRANTY
Please report bugs to http://sourceforge.net/p/dfu-util/tickets/
Found DFU: [2e3c:df11] ver=0200, devnum=7, cfg=1, intf=0, path="1-1.2", alt=1, name="@Option byte /0x1FFFC000/01*512 g", serial="AT32"
Found DFU: [2e3c:df11] ver=0200, devnum=7, cfg=1, intf=0, path="1-1.2", alt=0, name="@Internal Flash /0x08000000/512*002Kg", serial="AT32"
Now run dfu-util -D /path/to/flashfloppy-at415-st105-3.36.dfu -a 0 -s 0x08000000:unprotect:force # this will fail with an error, but will unprotect the internal flash in the process.
Here is my result from running dfu-util -D etc as root (using sudo, and noting the '-a 0' is a zero, not an "oh"):
dfu-util -D /path/to/flashfloppy-at415-st105-3.36.dfu -a 0 -s 0x08000000:unprotect:force
Note on this next command, the wiki uses unprotect, but I found I needed to use mass-erase and run the command 3 times in a row before I had removed all the HxC config data from my GOTEK Drive and was able to fully use FlashFloppy again. Thank-you to Kierf from FlashFloppy for the tip on mass-erase, I was dead in the water without Kiera's help!
$ sudo dfu-util -D flashfloppy-at435-3.38.dfu -a 0 -s 0x08000000:mass-erase:force
dfu-util 0.9
Copyright 2005-2009 Weston Schmidt, Harald Welte and OpenMoko Inc.
Copyright 2010-2016 Tormod Volden and Stefan Schmidt
This program is Free Software and has ABSOLUTELY NO WARRANTY
Please report bugs to http://sourceforge.net/p/dfu-util/tickets/
Match vendor ID from file: 0483
Match product ID from file: df11
Opening DFU capable USB device...
ID 2e3c:df11
Run-time device DFU version 011a
Claiming USB DFU Interface...
Setting Alternate Setting #0 ...
Determining device status: state = dfuIDLE, status = 0
dfuIDLE, continuing
DFU mode device DFU version 011a
Device returned transfer size 2048
DfuSe interface name: "Internal Flash "
state(5) = dfuDNLOAD-IDLE, status(0) = No error condition is present
dfu-util: Wrong state after command "READ_UNPROTECT" downloaddfu-util -D /path/to/flashfloppy-at415-st105-3.36.dfu -a 0
Nearly there, now run dfu-util -D /path/to/flashfloppy-at415-st105-3.36.dfu -a 0 # Now that the flash is unlocked, the device will be programmed. Again, my results:
$ sudo dfu-util -D flashfloppy-at435-3.38.dfu -a 0
dfu-util 0.9
Copyright 2005-2009 Weston Schmidt, Harald Welte and OpenMoko Inc.
Copyright 2010-2016 Tormod Volden and Stefan Schmidt
This program is Free Software and has ABSOLUTELY NO WARRANTY
Please report bugs to http://sourceforge.net/p/dfu-util/tickets/
Match vendor ID from file: 0483
Match product ID from file: df11
Opening DFU capable USB device...
ID 2e3c:df11
Run-time device DFU version 011a
Claiming USB DFU Interface...
Setting Alternate Setting #0 ...
Determining device status: state = dfuIDLE, status = 0
dfuIDLE, continuing
DFU mode device DFU version 011a
Device returned transfer size 2048
DfuSe interface name: "Internal Flash "
file contains 1 DFU images
parsing DFU image 1
image for alternate setting 0, (2 elements, total size = 111964)
parsing element 1, address = 0x08000000, size = 28960
Download [=========================] 100% 28960 bytes
Download done.
parsing element 2, address = 0x0800c000, size = 82988
Download [=========================] 100% 82988 bytes
Download done.
done parsing DfuSe file
I ran this command three times in a row to ensure I had written all data to the GOTEK chip. I had problems when I ran it just once, which is really frustrating when you then need to re-open your Amiga 1000 to re-program again!!
Unplug usb cable.
Move programming jumper back to non-programming position.
Power off and back on, and if your result is the same as mine, you are now back to a factory GOTEK using FlashFloppy.
If you the last line of your dfu-util reports something like:
dfu-util: ERASE_PAGE not correctly executed
or
dfu-util: MASS_ERASE not correctly executed
Then you need to unprotect your device before you will able to write to it. Using the command above, reshow here for convenience:
dfu-util -D /path/to/flashfloppy-at415-st105-3.36.dfu -a 0 -s 0x08000000:unprotect:force
The 'force' modifier is required for Unprotect or mass-erase modifiers, it's nothing to be worried about.
Hopefully this helps someone, I have just one more tip for this blog entry on keeping your USB drives tidy, and removing 'droppings' left by Mac OSX...
Annoying hidden files produced any Mac OSX
An annoyance
with Mac OSX is that it leaves 'droppings' behind on all files it writes and trashes. HxC will kindly ignore these files so they won't bother you - a good reason to update to firmware v5.1.2.1a or newer!
These are normally hidden files, but they will show up when you use other operating systems with your USB drive, or an old File Selector software on your Amiga if you re using an old firmware. But it is easy to get rid of most of them:
Recently, I came across Or I recently came across CleanEject - which does the job for you, worth checking out. in an unrelated post. It does the same job as the instructions below.On Mac OSX, take note of the drive/volume name of the USB drive you are copying files onto, then open a terminal window.
type:
sudo dot_clean /Volumes/<name of the drive/volume you just took note of>This will delete nearly all the .<filename> hidden files Mac OSX writes - so if you just copied hundreds or thousands of files onto the drive, it could take a while (be patient, I've found a 600Mb transfer could take 15 minutes to complete! It's the number of files rather than size that takes more time. There is no status indicator, so you are just left wondering if it's working or not 😅.
These files are useful to Mac OSX only, and we don't need them or want them on the Amiga (or many other platforms).
You can use the command "
ls -a" to see the hidden files on a Linux system and Mac OSX.
Even after running the
dot_clean command, we are still left with a
.trashes and a .fseventsd% cd /Volumes/backup
% ls -a
. Boot HxC
.. Cannon_Fodder_Save.hfe IMAGE_A.CFG
.fseventsd Demos OS&Apps
AUTOBOOT.HFE Drivers Save_Games.adf
Blank_AmigaDOS.adf Games z_Empty_ADF
Blank_AmigaDOS.hfe HXCSDFE.CFG
%
You can also remove these on a Raspberry Pi with the commands:
rm -r .fseventsd
rm -r .trashesrm is the command to "ReMove" files, and the
-r means recursive, which will delete all files and subfolders, and then the hidden (and unwanted) directory itself. If you have copied a lot of files over, this could take a few extra seconds or minutes to complete.
IPF Support on the HxC:
When adding support to the HxCFloppyEmulator application, you will see instructions about adding CAPSImage before this application will read IPD disks. CAPSImage does not work, at least not on MacOSX Ventura (13.x).
You need 'libfs-capsimage.dylib', which you add to the HXCFLoppyEmualtor software on Mac OSX by:
(Assuming you have HXCFloppyEmulator in your /Applications folder)
Right click on HxCFloppyEmulator and choose 'Show Package Contents'
From here navigate to Contents/Frameworks
copy the 'libfs-capsimage.dylib' file here, right next to the existing files libhxcfe.dylib and libusbhxcfe.dylib (see attachment to this post)
Close all that, and then open the HxCFloppyEmulator application.
You need to go to Settings/Internal Parameters in the HxCFloppyEmulator v2.5.6.6 and scroll to the bottom of the parameters and change the SPS_LIB_NAME name to:
/Applications/HxCFloppyEmulator.app/Contents/Frameworks/libfs-capsimage.dylib
Now you can click Load and point to an IPF file, you should see a message at the bottom on HxCFloppyEmulator (v2.5.6.6) with the filename and how many tracks and sides are in the image.
Click Export to convert to HFE (or use the batch export button and convert a whole folder of files in one go), and make sure you use HFE V3 experimental (I believe the other HFE variants have problems with Amiga formats and protections).
Using FATsort
One annoying 'feature' is that files are not alphanumerically sorted, and appear a bit random as they are sorted by timestamp, not by name. To fix this you need a tool, and I found FATsort.
Once downloaded, unarchive it to a folder that will be easy for you to find, and open a Terminal window. Navigate to the folder where you have unarchived FATSort and type make
That's it. Make should pick up the Makefile in the folder, and a few seconds later it is done.
copy the newly built fat sort executable from the src directory to somewhere easy to find. and from there, type:
fatsort /dev/<disk#s1>
where disk#s1 is the FAT formatted disk and partition you want sorted.
% ./fatsort -h
FATSort sorts directory structures of FAT file systems (FAT12, FAT16, FAT32 and exFAT). Many MP3 hardware players don't sort files automatically but play them in the order they were transferred to the device. FATSort can help here.
Usage: fatsort [OPTIONS] DEVICE
Sort options:
-a Use ASCIIbetical order for sorting
-c Ignore case of file names (default for most locales)
-I PFX Ignore file name PFX
-n Natural order sorting
-o FLAG Sort order of files where FLAG is one of
d : directories first (default)
f : files first
a : files and directories are not differentiated
-r Sort in reverse order
-R Sort in random order
This options makes all other sort options obsolete.
-t Sort by last modification date and time
The following options can be specified multiple times
to select which directories shall be sorted:
-d DIR Sort directory DIR only
-D DIR Sort directory DIR and all subdirectories
-x DIR Don't sort directory DIR
-X DIR Don't sort directory DIR and its subdirectories
The following options can be specified multiple times
to select which directories shall be sorted using
POSIX.2 extended regular expressions:
-e RE Only sort directories that match regular expression RE
-E RE Don't sort directories that match regular expression RE
However, options -e and -E may not be used simultaneously with
options -d, -D, -x and -X.
-L LOC Use the locale LOC instead of the locale from the environment variables
More options:
-l Print current order of files only
-i Print file system information only
-f Force sorting even if file system is mounted
-h, --help
Print some help
-v, --version
Print version information
-q Be quiet
DEVICE must be a FAT12, FAT16, FAT32 or exFAT file system.
WARNING: THE FILESYSTEM MUST BE CONSISTENT (NO FILESYSTEM ERRORS).
PLEASE BACKUP YOUR DATA BEFORE USING FATSORT. RISK OF CORRUPT FILESYSTEM!
FATSORT USER ASSUMES ALL RISK. FATSORT WILL NOT BE HELD LIABLE FOR DATA LOSS!
Examples:
fatsort /dev/sda Sort /dev/sda.
fatsort -n /dev/sdb1 Sort /dev/sdb1 with natural order.
Report bugs to <fatsort@formenos.de>.
%
Modding the Amiga 1000 to replace DF0:
Finally entry for this post! Just to finish off the mod made to replace my DF0:
My first attempt:
David Dunklee put me onto what I think is the best
Amiga 1000 3d-Printed mount on Thingiverse. It inspired me to go ahead and do the mod, however I found that the Rotary switch and PCB on my AT4.35 GOTEK did not fit and I had to modify the 3D-Print by cutting out the 3D-print frame, around where the rotary switch and PCB would sit.
I also had to modify my case (I know, blasphemy) to cut a small 'shelf' that sits under the floppy drive button on the front face plate (inside side) to fit the rotary shaft as far into the floppy button cutout as I could. This was necessary to get enough stem of the rotary switch through to fit the button back on and still be able to rotate and click.
This also meant I had to use glue to hold the rotary switch in place (be careful not to glue the shaft where it needs to rotate and click(. It was not pretty from the inside.
The other mod to the GOTEK was to desolder the pins off the OLED display and replace with a longer cable. This would allow the OLED display to sit flush on the outside of the case. Be very careful:
- If the soldering iron gets too close to the OLED display, you will get a dramatic smokey effect which you're unlikely to see as attractive
- The GOTEK boards are very delicate, tracks lift and solder pads disintegrate really easily, so turn your iron down! I had mine at 360 deg celsius, and it was too hot.
The end result looked good, but I lost easy access to the 2 buttons, and that became a real pain for upgrading firmware:
So I had another attempt, and this time without a 3D print as I needed more flexibility in where and how I would position the GOTEK board. And another full disclosure - I actually destroyed the first GOTEK drive with my soldering iron being too hot. My OLED display could not take anymore of my butchering and it died (I couldn't find. replacement). I lost my LED light, and made some other mistakes which rendered the board lifeless.
Fast forward to my next attempt. I used hot glue to hold the board in place, it actually does a great job and the GOTEK board is very secure. Hot glue is also easy to remove later if I had too.
The blue universal anchor can be found in any hardware store, typically used for when you need to screw into brickwork.
 |
| I also needed to extend my floppy power connector. Using solder -splices made joining cables a breeze! |
And I'm happy with the final result, noting I removed any choice in the matter for myself from my earlier mod (
74LS157).
And that is all I have time for in this blog post, good luck in your own virtual floppy drive experience!
Regards,
Dwight.


